How to do a Bulge or “dented” effect using Tyflow openVDB.
The last update of Tyflow added nodes to work with openvdb volumes. Then, for the first time, 3DS Max artists can create meshes and effects using the openvdb library.
In this tutorial I will show you how to do a “dented” or “bulge” effect using Tyflow. The efffect is not complicated. The artist only have to take care to follow the steps in order to achieve the bulge effect. Let’s get started.
I’ve created a scene with a Torus, a Sphere and a Teapot object. The Torus is the object that will be cut. Then, I’ve already placed the Sphere and the Teapot (the cutters) at the desired place. After that I’ve created the Tyflow Object.
,
2. Now, we have to follow this logic: Dilate the base mesh (the Torus) and the bulge mesh (the cutters. In this case, the Teapot and the Sphere). After that we need to do a boolean intersect operation between the both dilated vdb’s. Then, we have to subtract (boolean subtraction) the ¨bulge vdb” (the Sphere and the Teapot) from the base vdb (the Torus); and subtract the vdb intersection result from the “bulge mesh”. The last to do is combine (boolean add) both subtractions, and we have the final result.
,
3. Creating the VDBs: Open up the Tyflow editor. You can scroll to find the vdb nodes or use the filter to only display the vdb nodes. Add a Birth vdb node to convert the meshes to openvdb sdf volumes. The voxel size controls the quality and precision of the vdb volume. As the value decreases, the resolution of the vdb volume increases. For this tutorial, we can work with the default value of 1,0.
,
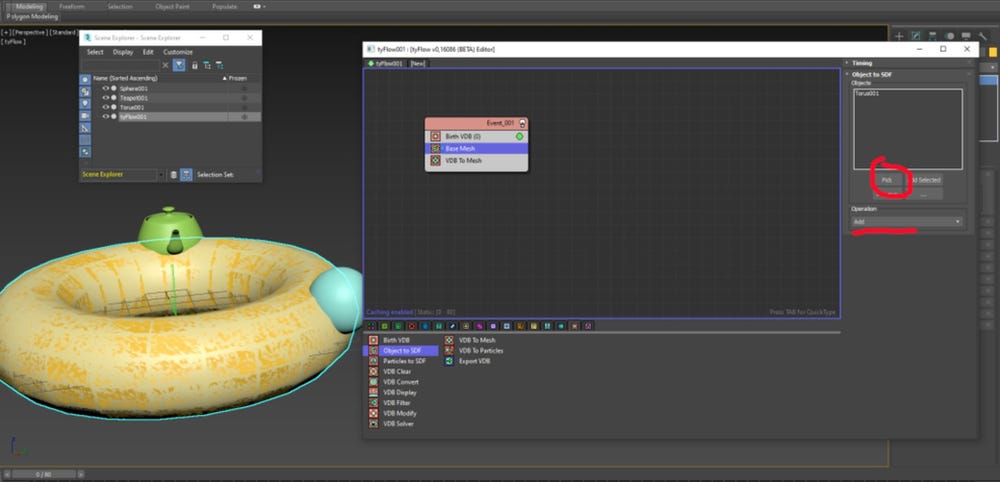
4. Add the Object to SDF node and pick the object that will be the base mesh. In this case, the Torus. For this example, I’ll rename the nodes for the clarity of all steps.
,
5. Add another Object to SDF node. This one will convert the cutters (Sphere and Teapot) to vdb volumes. Then, pick the Sphere and Teapot objects. Note that the operation was set to Intersect.
,
6. Hide all objects, except the Tyflow object. We can see the result of the boolean intersect operation between the base mesh (torus) and the bulge mesh (sphere and teapot).
,
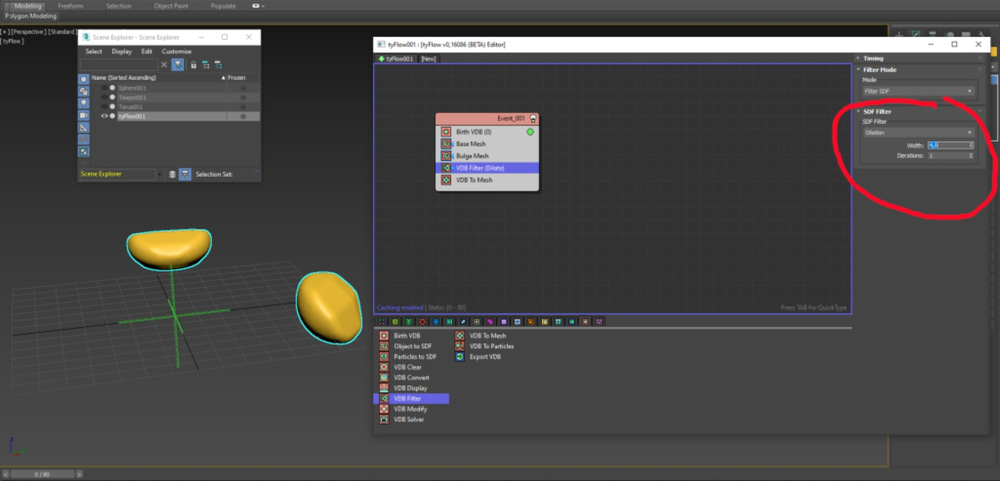
7. The VDB Filter node will be used to dilate the vdb intersection result. This pass will prepare the intersect mesh to be cut by the bulge mesh (the cutters) and, therefore, create the “dented” or “bulge” effect. in this example we used a dilation width of 4,0.
,
8. Add another Object to SDF node. Pick the cutters (Sphere and Teapot) and set the operation to Subtract. This will subtract the cutters from the dilated mesh operation done before.
,
9. Now we have to add again the base mesh (the Torus). Add an Object to SDF node and pick the Torus object.
,
10. Now we have to cut the base mesh (Torus) with the cutters. Add an Object to SDF node, set it to Subtract and pick the Sphere and teapot objects.
,
11. Unhide the Sphere and Teapot. Then, we have the final result.
,
12. If you move the Sphere or the Teapot, the bulge is updated accordingly.
,
,
13. But, the Torus looks faceted. Commonly, the artist first move is to add a VDB Filter to smooth the mesh or to increase the VDB resolution. However, a better solution is to work with an already smoothed object and then add a VDB Filter to fine tune the smoothness. First, disable the Tyflow event and unhide all objects.
,
14. Select the Torus object and increase the segments to 96 and sides to 48.
,
15. Hide the Torus object and enable the Tyflow event. Not that the Torus is already more smoothed.
,
16. Add a VDB Filter set to Mean and width equals to 1 to fine tune the smoothness.
,
The last pass: the previous object subdivision operation avoids the nodes overload caused by using too many VDB Filter nodes.
17. And the work is done! Now we have a template. You can add other objects or replace the existing ones in the Object to SDF nodes. The bulge effect will be update appropriately.
,


